The Rehab Therapist's Guide to Using CMS-1500 Claim Forms
WebPT teaches you how to fill out CMS-1500 claim form fields like a pro with this comprehensive guide on the process.


Subscribe
Get the latest news and tips directly in your inbox by subscribing to our monthly newsletter
Healthcare billing can get even the best billers tangled up in knots—and it’s no wonder why. Between tracking and adhering to shifting payer guidelines, managing patient claims, verifying insurance, and defending against denials, billers are pulled and twisted in a million different directions. That’s why it’s so important to have a strong billing foundation; a concrete understanding of your billing basics will help you pivot and twirl and handle the whirlwind of the billing office with ease. So, let’s talk about one of those billing basics: the CMS-1500 form. It’s long; it’s got tiny, hard-to-read text; it has a million instructions; and it’s the backbone of outpatient billing. So, let’s dive into everything you ever wanted to know about filling out those pesky CMS-1500 form fields.
Learning About the CMS-1500 Form
CMS-1500 forms were introduced in the 1980s to help standardize healthcare claims on a national level—and now, according to the National Uniform Claim Committee (NUCC), “the 1500 Claim Form is accepted nationwide by most insurance entities as the standard claim form/attending physician statement for submission of medical claims.” But as helpful as the CMS-1500 form was for aiding standardization, the paper version is starting to become a claim form of the past. Many modern electronic billing software and solutions eschew paper claims altogether, and help providers send the same claims without the hassle of filling out complicated, long-form paperwork.
But, unfortunately, some paper-only payers are still hanging around, and they require that billers print and fill out the entire form. The bad news is that you can’t just look up a PDF of the CMS-1500 form, fill it out, and call it a day. If you want to obtain your own copies of the form, you have to find a vendor that sells them. You can contact the U.S. Government Printing Office (1-866-512-1800) and request the forms if you’d like—but, you can also purchase the forms at office supply stores (e.g., Staples), printing companies, government websites, or even on Amazon. Just ensure that you’re using the most recent version of the form; you can do so by verifying that there’s a little (02/12) in the bottom right-hand portion of the document.
Following the Formatting Rules
Just because you’re submitting the CMS-1500 claim form on paper, that doesn’t mean you have to complete the entire form by hand. Some organizations (like the Washington State Department of Labor & Industries) have created digital PDF copies of the CMS-1500 form. However, while typing the claim information will be lightyears faster than writing it all out, it won’t do you any good if the claim is denied out of hand because you broke a formatting rule.
Take a look at these (extremely thorough) formatting suggestions compiled from guides written by Noridian and Excellus BlueCross BlueShield:
Fonts:
- Use a legible font only (Noridian requests Courier New, while Excellus requests Arial), and do not italicize or bolden any font.
- Do not use any special characters (e.g., decimals, dollar signs, dashes, periods, or backslashes) unless instructed.
- Do not squeeze multiple lines of info into one line.
Printer Settings:
- Use an inkjet or laser printer to print the completed form; do not use a dot matrix printer.
- Print in color: the empty template must print with red ink, and all filled fields must print with true black ink.
- Ensure that the printer cartridge does not leak, smudge, smear, or create any excess lines on the claim.
- Ensure that none of the printed characters touch.
You can, of course, complete your CMS-1500 forms by hand, but they will typically take longer to process than those that are typed. For handwritten forms, legibility is key. Write in black ink, use all capital letters, don’t write between the lines, and don’t use Wite-Out if you make a mistake (just start over with a fresh form!).
Filling Out The Form—Field by Field
Now that you’ve finished prepping, it’s time to dig into the meat and potatoes of the form-filling experience: inputting claim info. I’m going to go field by field and explain exactly what needs to go where—and how it needs to look, based on the instructions published by the NUCC.
Top Half: Patient and Insurance Information
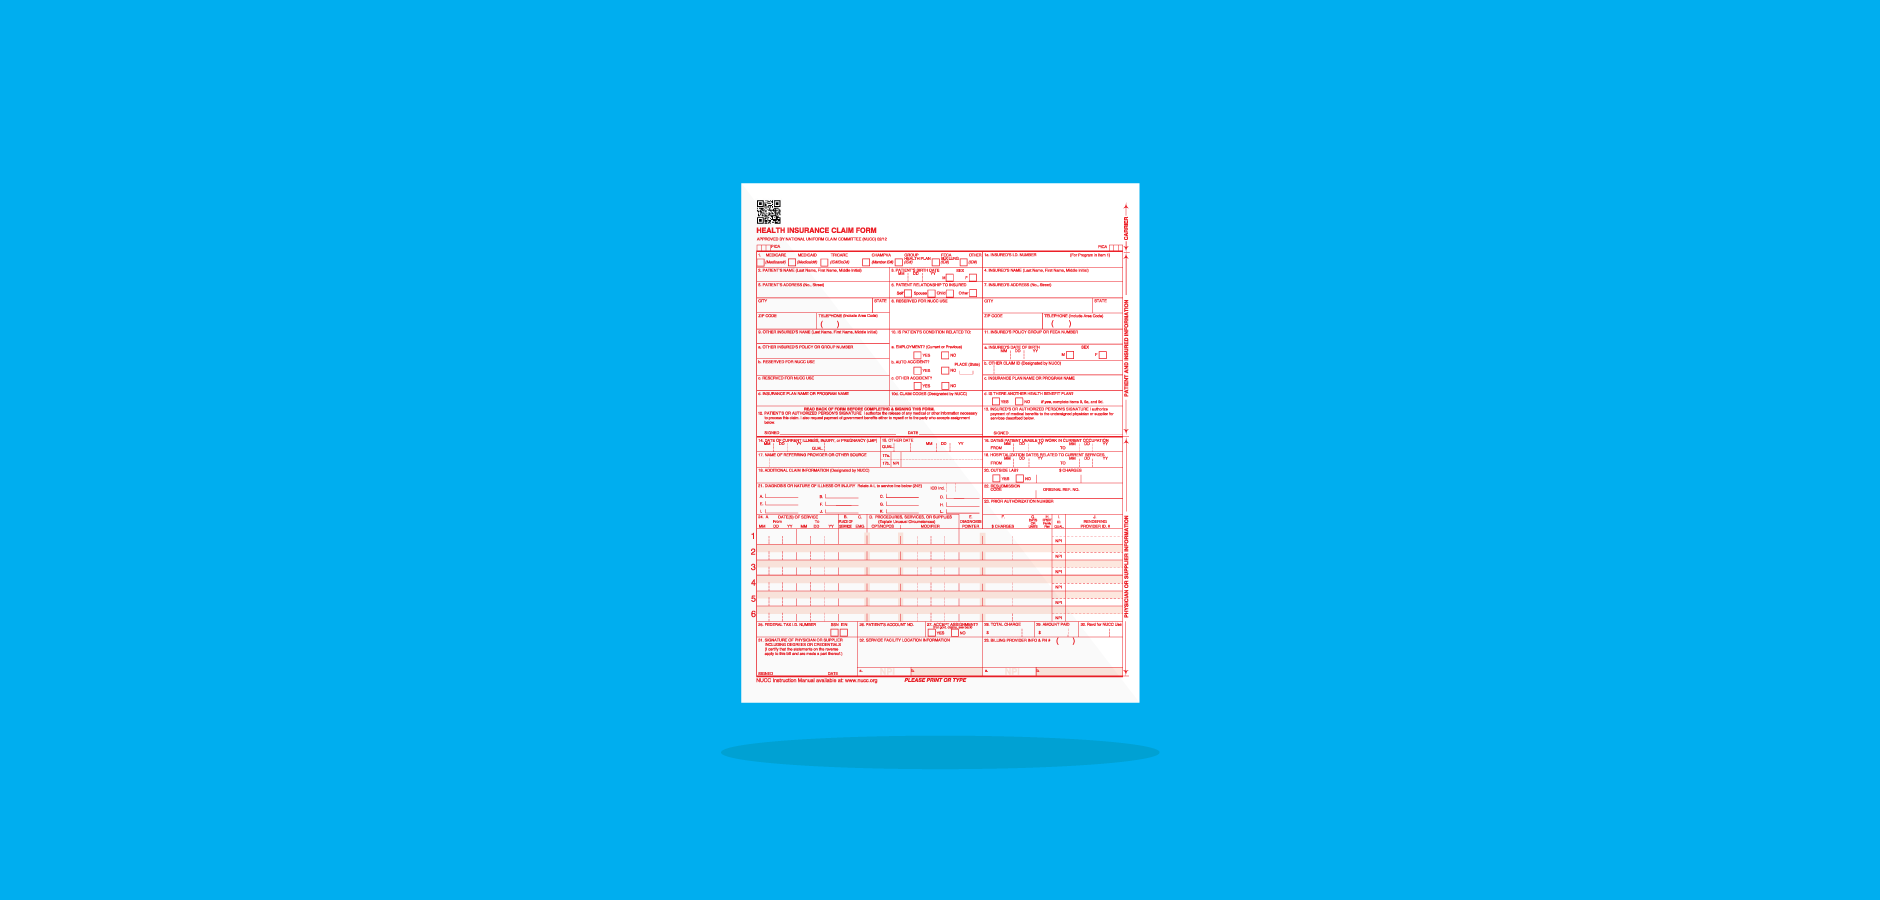
Item 1
Select the payer that you intend to send this claim to. For example, if you’re sending a claim to Medicare, mark the box beneath Medicare with an X. If you’re sending the claim to a commercial payer, mark the box beneath Group Health Plan with an X.
Item 1A
Input the insured’s ID number as shown on the insurance card.
Item 2
Input the patient’s name as it appears on his or her insurance card in this order: last name, first name, middle initial (e.g., Smith, John J). Do not include titles “(e.g., Sister, Capt, Dr)” or “professional suffixes (e.g., PhD, MD, Esq)” in this field. You may, however, include last name suffixes, like Jr or Sr.
Item 3
Input the patient’s birthday (MM DD YYYY) and mark his or her sex with an X. If the patient’s sex is unknown, leave that field blank.
Item 4
Input the insured’s name as it appears on his or her insurance card in this order: last name, first name, middle initial (e.g., Smith, John J). Do not include titles “(e.g., Sister, Capt, Dr)” or “professional suffixes (e.g., PhD, MD, Esq)” in this field. You may, however, include last name suffixes, like Jr or Sr.
Item 6
Mark the box that describes the patient’s relationship to the insured (i.e., self, spouse, child, or other) with an X.
Item 7
This item contains five different fields that request the insured’s address—specifically, the street address, city, state, and zip code (in that order)—and the insured’s telephone number. Supply this information where requested. Do not use punctuation. You may supply a five- or nine-digit ZIP code, but do not use a hyphen if you supply the nine-digit ZIP code. You do not have to report the insured’s phone number unless specifically instructed to by a payer. If you input a phone number, do not use a hyphen or a space to separate the numbers.
Item 5
This item contains five different fields that request the patient’s address—specifically, the street address, city, state, and zip code (in that order)—and the patient’s telephone number. Supply this information where requested. Do not use punctuation. You may supply a five- or nine-digit ZIP code, but do not use a hyphen if you supply the nine-digit ZIP code. You do not have to report the insured’s phone number unless specifically instructed to by a payer. If you input a phone number, do not use a hyphen or a space to separate the numbers. If the patient’s address is the same as the insured’s address, you may leave these fields blank.
Item 8
Leave this field blank.
Items 10A, 10B, and 10C
Indicate whether or not the patient’s condition that’s being treated is related to employment, an auto accident, or another accident by marking the relevant boxes labeled “YES” or “NO” with an X. If you mark that the patient’s condition is due to an auto accident, then you must report the state postal code in which the accident occurred.
Item 10D
Leave this field blank unless your payer requests additional Condition Codes. If your payer requests additional Condition Codes, refer to the list provided by the NUCC and enter the applicable codes.
Items 11
If you marked “YES” on items 10A, 10B, or 10C (or if you completed item four), then you must complete this field with the primary insurance information. List the insured’s policy, group, or FECA number.
Item 11A
Input the insured’s birthday (MM DD YYYY) and mark his or her sex with an X—as in item 1A. If the patient’s sex is unknown, leave that field blank.
Item 11B
If submitting a claim to a property or casualty payer (e.g., homeowners or workers’ comp), input the correct modifier (Y4) to the left of the vertical dotted line and the relevant claim casualty number to the right. If this is not applicable, leave this section blank.
Item 11C
Input the name of the insurance plan or program as indicated in item 1A. Check with your payer and determine whether you need to replace the name of the insurance plan with the primary payer’s identification number.
Item 11D
Indicate whether or not the patient has insurance coverage in addition to the previously listed plan by marking the relevant box with an X.
Items 9, 9A, and 9D
If you marked “YES” in item 11D, complete these items. Otherwise, leave these fields blank. You may leave item nine blank if the health plan’s enrollee is the same person listed in item two. If this is not the same person, then input the insured’s name as it appears on his or her insurance card in this order: last name, first name, middle initial (e.g., Smith, John J). Do not include titles “(e.g., Sister, Capt, Dr)” or “professional suffixes (e.g., PhD, MD, Esq)” in this field. You may, however, include last name suffixes, like Jr or Sr.
In field 9A, input the insured’s ID number as shown on the insurance card. Then, in field 9D, record the insurance plan name or the program name.
Items 9B and 9C
Leave these fields blank.
Items 12 and 13
In item 12, include the patient’s (or authorized person’s) legal signature—or input “Signature on File” or “SOF”—and the sign date (MM/DD/YYYY) to indicate that the patient (or an authorized person) has authorized the release of his or her medical information to process the claim. If there is no signature on file, leave the field blank.
Follow these same steps for item 13, but for the insured party (who may not necessarily be the patient).
Bottom Half: Diagnosis and Treatment
Item 14
Input the first onset date (MM DD YYYY) of the current illness or injury. Then, after the date, include modifier 431 to indicate that date represents the onset of the patient’s current illness or injury.
Item 15
Input another date that’s related to the patient’s condition or treatment (MM DD YYYY). You may report the initial treatment date, the date last seen, or the date of the accident. To the left of the date, include a qualifying modifier to represent which date you chose.
- 454: Initial Treatment
- 304: Last Seen
- 439: Accident
Item 16
If the patient is currently employed but is unable to work due to this condition, record the dates that the patient wasn’t able to work in the MM DD YYYY format. If this condition doesn’t affect the patient’s ability to work, leave this field blank.
Item 17
In this field, record the name of the referring provider (first name, middle initial, last name). Do not use any punctuation (hyphens are allowed if the provider has a hyphenated name). On the left side of the field, include the modifier DN to indicate that the name you provided was a referring provider.
Items 17A and 17B
In the 17A field, include the referring provider’s state license number or provider commercial number. If you include the provider’s state license number, enter the 0B modifier on the left-hand side of the field. If you include the provider’s commercial number, enter the G2 modifier on the left-hand side of the field.
Record the referring provider’s 10-digit NPI number in field 17B.
Item 18
Only fill out this field if your treatment is “a direct result of, or subsequent to, a related hospitalization.” Otherwise, leave this field blank. If your treatment is a result of, or related to, a hospitalization, record the patient’s admission and discharge dates (MM DD YYYY).
Item 19
Fill out this field based on the preference of your payer. Some payers will require treatment or diagnosis information, while others might request additional provider information or supplemental claim information. Whatever the case, refer to the NUCC Claim Form Instruction Manual for further instruction.
Item 20
Use this field to indicate whether or not lab services were rendered by an independent provider. If you mark “YES,” then include the dollar amount for the charges. Do not use commas, a decimal point, or a dollar sign. If the amount charged is a whole number, add “00” to the end of the number to represent cents.
Item 21
This field is for diagnosis codes. In the upper-right corner of the box, include the number 0 to indicate that you’re recording ICD-10 codes. Then, in fields A through L, record the ICD-10 codes that represent, to the highest level of specificity, the “sign, symptom, complaint, or condition of the patient” related to your rendered services.
Item 22
Only complete this field if you’re resubmitting this claim; otherwise, leave this field blank. If you’re resubmitting this claim, include resubmission code seven or eight to indicate that this claim is the replacement of a prior claim or a voiding/cancellation of a prior claim, respectively. Then, input the original reference number provided by the payer.
Item 23
Include the payer’s prior authorization number in this field.
Section 24
This is, by far, the most complicated section in this entire claim form, and arguably the most important. This is the section where you list the services rendered. You may only list six line items. I recommend that you complete one entire line item before you progress to the next one—and ensure that you double- and triple- check your data entry! You may also provide supplemental information (if required by the payer) in the unbroken, shaded line next to line-items one through six.
24A
In these fields, enter the start- and end-dates of service in the MM DD YY format. If there is only one date of service, include that single date of service under the “From” column, and leave the “To” column blank. Alternatively, you can enter the same date in the “From” and “To” columns to indicate that there was only one date of service.
24B
In this field, enter the correct two-digit place of service code as selected using CMS’s Place of Service Code Set.
24C
Field 24C indicates whether or not the service was an emergency. If it was, then mark the field with “Y.” If it was not, then leave this field blank.
24D
Enter the CPT code that you wish to bill, along with any applicable modifiers (e.g., KX or 59).
24E
Input the diagnosis code reference letters (referenced in item 21) to indicate which diagnosis this service, procedure, or supply is meant to address. Do not enter full ICD-10 codes in this field. Only include the reference letters from the beginning of the code.
24F
Enter the charge amount you wish to bill for the CPT code. Put whole numbers to the left of the dividing line; cents go on the right. If the amount charged is a whole number, use “00” to represent cents. Do not use dollar signs, decimals, or periods in this field.
24G
In this field, write the number of units you wish to bill for this CPT code.
24H
This field indicates whether or not a service is covered under a state plan. Contact the payer to determine if a Y/N response is acceptable for this field, or if they want additional information. If they want additional information, input the applicable codes from the following list in the shaded, top-half portion of this field.
- AV: “Available – Not Used (Patient refused referral.)”
- S2: “Under Treatment (Patient is currently under treatment for referred diagnostic or corrective health problem.)”
- ST: “New Service Requested (Referral to another provider for diagnostic or corrective treatment/scheduled for another appointment with screening provider for diagnostic or corrective treatment for at least one health problem identified during an initial or periodic screening service, not including dental referrals.)”
- NU: “Not Used (Used when no EPSDT patient referral was given.)”
If you need to report this line item as a Family Planning service, input Y in the unshaded, lower portion of this field. If you do not need to report this line item as a Family Planning service, leave the lower portion of this field blank.
24I
This field is a preface to 24J. Select the type of provider identification number you’d like to provide—a state license number, provider UPIN number, provider commercial number, or provider taxonomy. Then, write the corresponding modifier (0B, 1G, G2, and ZZ, respectively) in this field.
24J
In the top, shaded portion of this field in the line-item, provide the number that corresponds to the modifier you provided in the previous section (i.e., a state license number, provider UPIN number, provider commercial number, or provider taxonomy). Then, in the bottom, unshaded portion of this field, input the rendering provider’s NPI.
Item 25
Input the employer ID or SSN number of the billing provider in this field. Depending on which number you provide, mark the box beneath “EIN” or “SSN” with an X.
Item 26
Input the patient’s account number, as seen in the provider’s accounting system (without any punctuation).
Item 27
Mark the box beneath “YES” or “NO” to indicate whether or not the provider accepts assignment under the payer’s terms.
Item 28
Add up all the charges from item 24F, and enter them in this field without punctuation. Put whole numbers to the left of the dividing line; cents go on the right.
Item 29
Total any payments you’ve received from the patient or other payers in this field without punctuation. Put whole numbers to the left of the dividing line; cents go on the right.
Item 30
Leave this field blank.
Item 31
In this field, include the rendering provider’s (or a representative’s) legal signature, including credentials (e.g., Heidi Jannenga, DPT). Alternatively, you may input “Signature on File” or “SOF.” In either case, include the date of the signature (MM/DD/YYYY).
Items 32, 32A, and 32B
In field 32, include the name and address (in the following format) of the facility where services were rendered:
- Name
- Address
- City, State, and nine-digit ZIP Code
Do not use any punctuation.
If the service facility NPI is different than the provider’s NPI, report the service facility’s 10-digit NPI in field 32A. Otherwise, leave the field blank. In field 32B, you must provide an additional facility identification number. Choose which number you’d like to provide (state license number, provider commercial number, or location number), write the appropriate modifier (0B, G2, or LU, respectively), and then input the identification number (e.g., G2A1234567890).
Items 33, 33A, and 33B
In field 33, include the name and address (in the following format) of the billing provider:
- Name
- Address
- City, State, and nine-digit ZIP Code
Do not use any punctuation. Additionally, include the phone number of the billing provider using the parentheses provided on the form—and don’t separate the numbers with a hyphen or a space.
In field 33A, include the NPI of the billing provider. In field 33B, you must provide an additional provider identification number. Choose which number you’d like to provide (state license number, provider commercial number, or provider taxonomy), write the appropriate modifier (0B, G2, or ZZ, respectively), and then input the identification number (e.g., G2Z5678901234).
The CMS-1500 form is definitely tough to master—and it’s just one piece of a big ol’ thousand-piece billing puzzle! So, if you have any questions regarding this claim form (or any other billing pickle), feel free to leave them below! We’ll do our best to hunt down answers so you can bill with confidence.